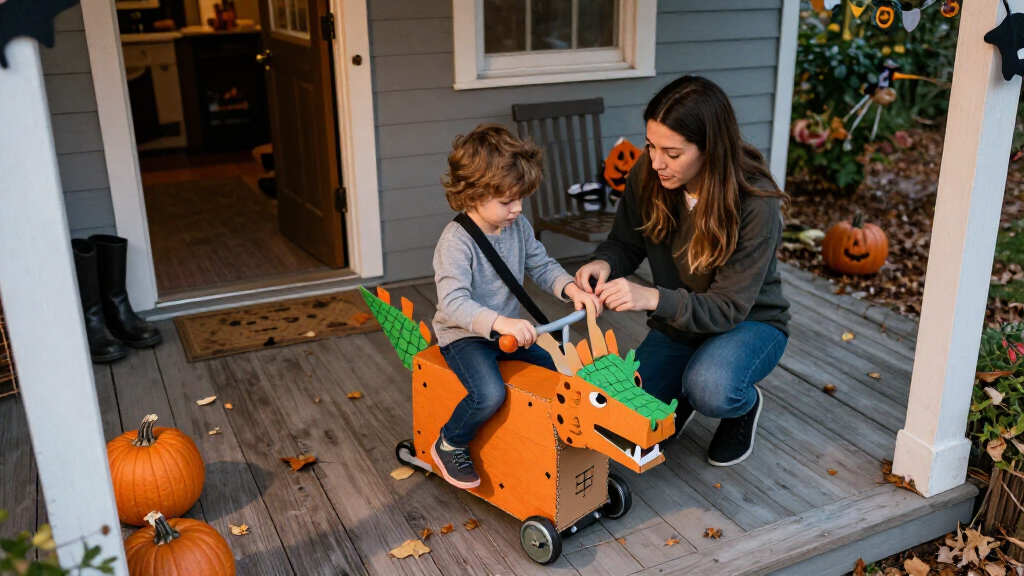
Make a kids’ Halloween ride-on costume that looks like your child is sitting on a vehicle, creature, or other prop while walking. This guide is for an adult making a costume with basic craft skills and a child who can take part in fitting and testing it. You will plan a lightweight shape, build it around clothing the child can move in, and check that the costume stays secure and allows clear vision. Allow 2–4 hours for assembly, plus any paint or glue drying time.

Turn the school run and nap time into listening time
- Thousands of audiobooks, podcasts and originals
- Listen on your phone, tablet or Echo — also offline
- Cancel anytime

Disney Toy Story Bullseye Inflatable Ride-On Costume
- ✔ Material: 100% polyester
- ✔ Design: Inflatable ride-on Bullseye horse illusion
- ✔ Inflation: Battery-operated fan

COMIN Inflatable Flamingo Costume for Kids
- ✔ Material: Waterproof polyester
- ✔ Construction: Reinforced stitching
- ✔ Sizes: Ages 4–6: 3.3–4.1 ft; ages 7–10: 4.1–4.9 ft
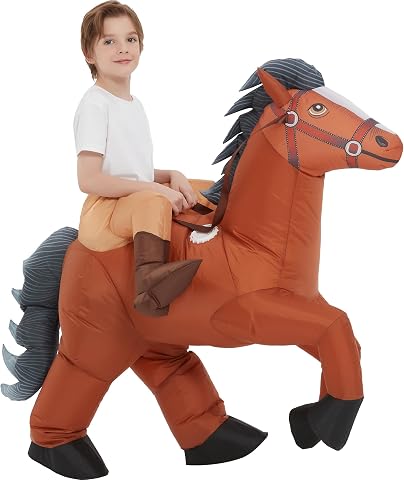
One Casa Inflatable Horse Costume for Kids
- ✔ Material: Polyester; described as waterproof
- ✔ Construction: Reinforced stitching
- ✔ Fit: Ages 4–6: 3.3–4.1 ft; ages 7–10: 4.1–4.9 ft
Difficulty: Beginner | Time: 2–4 hours, plus drying time
What You’ll Need
Tools & Materials:
- Flexible measuring tape
- Scissors and craft knife for adult use
- Ruler and washable marker
- Hot glue gun or strong craft glue, used by an adult
- Needle and thread or a sewing machine
- Painter’s tape
Knowledge:
- Basic measuring, cutting, and gluing
- Ability to supervise a child during fitting and testing
Choose a simple design such as a cardboard car, rocket, dinosaur, or horse. Gather lightweight cardboard or foam board, fabric or a child-sized pair of trousers in a matching color, elastic or adjustable straps, and decorations. Avoid heavy frames, sharp edges, long trailing pieces, and small decorations that could come loose. Check the forecast and local trick-or-treat route so the costume can fit over warm clothing and work outdoors.
Disney Toy Story Bullseye Inflatable Ride-On Costume
Bullseye is the character-first choice in this lineup: its inflatable ride-on design creates the illusion that the child is riding Woody’s horse, giving it an obvious place in a Toy Story group costume. Compared with One Casa’s horse, Bullseye brings official Disney Toy Story licensing and a named character; compared with COMIN’s flamingo, it trades an unusual animal look for a familiar story-world reference. That makes the design especially easy to build a themed outfit around.The package includes the inflatable suit and a battery-operated fan, so the inflation mechanism is accounted for. The listing does not say which batteries it needs or whether they are supplied, however, and it offers no sizing details. Those gaps matter more here than the broad polyester specification: families cannot use the supplied information alone to confirm fit or prepare the power source. We would put Bullseye ahead of the other options when character recognition is the priority, but choose COMIN or One Casa when stated height ranges are essential to deciding.Our tradeoff is clear: strong licensed appeal, limited planning detail. This pick makes the most sense for a child set on Bullseye and a family willing to verify size and battery requirements before purchase. If we need a documented height range to narrow the choice, COMIN and One Casa give us more to work with.
Pros:
- Officially licensed Disney Toy Story design
- Ride-on illusion centers on the recognizable Bullseye character
- Battery-operated fan is included
- Described for Halloween, parties, and group costumes
Cons:
- Sizing details are not provided
- Battery type and inclusion are not specified
- Polyester is listed without a waterproof claim
Best for: Toy Story fans who want a recognizable Bullseye ride-on look for Halloween, parties, or a themed group costume.
Not ideal for: Families who need published height ranges or battery specifications before they can confidently plan fit and inflation.
Bottom line: Choose Bullseye when the Toy Story character is the main draw and you can confirm fit and battery needs separately.
“Choose Bullseye when the Toy Story character is the main draw and you can confirm fit and battery needs separately.”
COMIN Inflatable Flamingo Costume for Kids
COMIN is the easiest option here to size from the information provided. It lists two height bands—3.3–4.1 feet for ages 4–6 and 4.1–4.9 feet for ages 7–10—and pairs those with an adjustable waist using elastic and a drawstring. That gives us more concrete fit guidance than Bullseye, whose sizing is absent, and makes the flamingo a sensible first look when choosing for a growing child. The design is also the lineup’s most visually distinct departure from the horse-shaped ride-on idea.The waterproof polyester and reinforced stitching are practical stated construction details, while the included blower is intended to keep the costume inflated. In contrast to One Casa, COMIN specifies four AA batteries or a portable charger as power options. But batteries are not included, so families still need to provide a compatible source; the description does not state expected runtime. A flamingo also will not suit every child or match a Toy Story group as neatly as Bullseye.We rank COMIN first because it combines the strongest fit information with an adjustable waist and a clearly described blower setup. Its advantage is predictability, not universal appeal. Choose it when height guidance and a playful animal silhouette matter; skip it if the child wants a character costume or you prefer not to arrange separate power.
Pros:
- Two stated height-based size ranges
- Adjustable waist with elastic and drawstring
- Waterproof polyester with reinforced stitching
- Blower included, with AA battery or portable charger options
Cons:
- Four AA batteries or portable charger are not included
- No runtime estimate is supplied
- Flamingo design may not fit a character-themed costume plan
Best for: Families who want height-based size guidance, waist adjustment, and a distinctive animal ride-on look.
Not ideal for: Shoppers seeking a licensed story character or a costume that arrives with batteries included.
Bottom line: COMIN is the most straightforward choice when fit planning and a distinctive flamingo design matter more than licensed character appeal.
“COMIN is the most straightforward choice when fit planning and a distinctive flamingo design matter more than licensed character appeal.”
One Casa Inflatable Horse Costume for Kids
One Casa is the straightforward horse alternative for children who want the ride-on silhouette but do not need Bullseye’s Toy Story identity. It shares the animal theme with the Disney pick, while its listing gives more useful fit guidance: ages 4–6 at 3.3–4.1 feet and ages 7–10 at 4.1–4.9 feet. The suit, air pump, and instruction sheet are included, so the basic inflation equipment is part of the package.Its waterproof polyester and reinforced stitching are described as helping resist rips and tears, and the costume is said to inflate within seconds. Those are useful claims for Halloween preparation, but the power arrangement needs attention: the pump requires a portable power bank or four AA batteries, and neither is included. The description also warns that the high-power fan can consume batteries quickly, without providing a runtime estimate. COMIN similarly requires a separate power source, but offers an adjustable waist and a flamingo design; One Casa’s stronger reason to choose it is the horse theme and included instructions.This is a practical pick if the child wants a horse and the family is comfortable arranging power and hand-washing the suit. It gives up Bullseye’s licensed character recognition, and it does not have COMIN’s stated waist adjustment. We would favor it when a horse look and height ranges are the priorities, not when the child wants a specific character or battery planning is a concern.
Pros:
- Two height-based fit ranges are provided
- Waterproof polyester with reinforced stitching
- Air pump and instruction sheet are included
- Described as inflating within seconds
Cons:
- Portable power bank or four AA batteries are not included
- High-power fan may consume batteries quickly
- Hand wash only
Best for: Children who want an inflatable horse ride-on look with stated height ranges and included pump instructions.
Not ideal for: Families who need an included power source, adjustable-waist details, or a licensed Toy Story character.
Bottom line: Pick One Casa for a height-specified horse costume without a character license, provided you can supply its power source.
“Pick One Casa for a height-specified horse costume without a character license, provided you can supply its power source.”
As an Amazon Associate we earn from qualifying purchases.
Before You Start
Ask the child to choose a design they can walk in comfortably. Decide where the body opening, arm openings, and viewing space will sit before cutting. Keep the child away from blades, hot glue, and wet paint. Do not attach the costume to a bike, scooter, stroller, or other moving equipment. Plan a version the child can remove quickly, and use battery-powered lights only if they can be secured without blocking vision or creating cords around the neck.
Step-by-Step Instructions
Step 1: Choose a simple ride-on shape
Choose one main shape that can sit around the child’s waist or hips, such as a car body, animal body, or rocket. Sketch its front, sides, and back on paper. Mark the child’s head and legs, the front viewing area, arm movement, and strap attachment points. Keep the shape narrow enough to pass through doorways and leave room for walking.
Tip: A flat-sided design made from cardboard or foam board is easier to balance than a bulky three-dimensional shell.
Check: The sketch shows an unobstructed face, free-moving arms, visible legs, and a clear way to remove the costume.
Step 2: Measure the child in Halloween clothing
Dress the child in the clothes and shoes planned for Halloween. Measure around the waist or hips, from the waist to the desired bottom edge, and across the body at its widest point. Measure from the waist to the floor so the costume does not cover the feet. Add room for a warm layer and natural movement.
Tip: Take measurements while the child stands and walks; a costume that fits only while standing still may catch on the legs.
Check: You have measurements for the body opening, costume height, and maximum width, including outerwear.
Step 3: Make the clothing base
Put matching trousers or leggings on the child to create the illusion that their legs belong to the costume. If the design needs a waist piece, cut a broad fabric band that fits over the clothing without squeezing. Sew or securely fasten the band to the top edge of the trousers, leaving access for the child to dress and use the bathroom.
Tip: Use clothes the child already owns when possible. Keep the waistband easy to open and close, and avoid pins or exposed fasteners.
Check: The child can put on the base without help from the costume shell and can bend their knees comfortably.
Step 4: Cut and assemble the outer shell
Transfer the sketch and measurements to cardboard or foam board. Cut the main panels with an adult handling the craft knife, then cover cut edges with painter’s tape or soft fabric. Join the panels with glue or strong tape. Cut a wide opening at the top for the child’s torso and leave enough room for the hips and legs to move.
Tip: Do not cut the viewing opening based only on the sketch. Fit the shell loosely and mark the opening while the child is wearing it.
Check: The shell holds its shape, has no exposed sharp edges, and sits around the child without pressing against their legs.
Step 5: Add adjustable support straps
Attach two broad straps inside the shell so it rests on the shoulders or upper torso, depending on the design. Use fabric straps, wide elastic, or a light harness arrangement with adjustable fasteners. Sew straps to fabric tabs or reinforce cardboard attachment points with extra layers. Keep all straps away from the neck, and leave one quick-release point the child or supervising adult can open.
Tip: Never rely on a single narrow strap or a loose cord around the neck. Reinforce attachment points before decorating the shell.
Check: The shell stays level when the child takes a few steps, and an adult can remove it quickly.
Step 6: Fit the costume and mark visibility
Dress the child in the clothing base and shell. Adjust the shoulder straps until the costume is stable. Ask the child to look left and right, look down, raise both arms, sit, and take several steps. Mark any edge that blocks their view, catches on clothing, or makes them lift the costume to see. Enlarge the opening or reshape the shell before adding decorations.
Tip: The child should be able to see the ground immediately in front of their shoes and turn their head freely.
Check: The child can see forward and downward, move both arms, and walk without holding the shell in place.
Step 7: Decorate with secure, low-profile details
Paint or cover the shell, then add broad details such as wheels, windows, scales, or wings. Attach decorations firmly and keep them close to the shell so they do not snag on doorways, other costumes, or branches. Apply reflective tape to the front, sides, and back. Let paint and glue dry fully before the child wears the costume.
Tip: Keep the face uncovered and avoid dangling strings, sharp accessories, or decorations that reduce the viewing opening.
Check: Decorations stay attached when gently tugged, reflective details can be seen from several sides, and the shell has no wet or tacky areas.
Step 8: Run a supervised walk test
Dress the child in the finished costume with the planned coat, shoes, and accessories. Walk indoors first, then test in a safe outdoor area if conditions allow. Include turns, a step up and down, a gentle crouch, and picking up a treat bag. Recheck the straps and leg clearance, then shorten, raise, or pad any part that catches or presses.
Tip: Stay close during the test. Do not let the child run, climb, or use stairs alone while wearing an unfamiliar costume.
Check: The child can walk and turn without tripping, see the path, carry a treat bag, and remove the costume with adult help.
Common Mistakes to Avoid
- Making the shell too wide or too long. — Measure over the child’s Halloween layers, keep the sides close to the body, and leave the legs and shoes unobstructed.
- Attaching the costume with cords or narrow straps. — Use broad adjustable straps anchored to reinforced points, keep them away from the neck, and add a quick-release fastening.
- Decorating before checking fit and visibility. — Fit and walk-test the undecorated shell first; adjust openings and balance before adding paint or details.
- Using loose pieces or lights that snag. — Secure decorations close to the shell, avoid trailing parts and cords, and use reflective tape for visibility.
Troubleshooting
Problem: The shell tilts forward or slips while walking.
Solution: Reposition the straps so the shell’s weight sits evenly on the shoulders or torso. Reinforce weak attachment points and shorten loose strap ends.
Problem: The child cannot see the ground or turn their head.
Solution: Enlarge or raise the viewing opening, remove decorations near the face, and repeat the walk test before using the costume.
Problem: The costume catches on the child’s legs or shoes.
Solution: Raise the bottom edge, narrow the side panels, and remove any pieces that extend near the knees or feet.
Problem: Glue or paint is still wet near Halloween.
Solution: Follow the product’s drying instructions and keep the costume off the child until it is fully dry. If time is short, switch to fabric panels or tape that are ready to wear.
What Success Looks Like
The finished costume stays level and secure, leaves the child’s face and view of the path clear, and does not cover or catch on their feet. The child can turn, bend, carry a treat bag, and walk at a steady pace. Straps and decorations remain attached during the test, reflective details are visible, and an adult can remove the costume quickly.
Next Steps
Store the costume flat in a dry place and check the straps, edges, and decorations before each wear. Bring a small repair kit with tape and spare fasteners if the child will wear it for an evening event. If the shell becomes wet, damaged, or unstable, stop using it until it is dry and repaired. Refit the costume if the child will wear thicker layers or if they have grown since the first test.
Frequently Asked Questions
What is the easiest material for a kids’ ride-on costume?
Lightweight corrugated cardboard is inexpensive and easy to cut, while foam board can create cleaner flat panels. Reinforce attachment points and cover sharp edges whichever material you choose.
Can a child wear a ride-on costume over a winter coat?
Yes, if you measure and fit the costume over the coat they will actually wear. Repeat the walk test with the coat, shoes, and accessories to check movement and visibility.
How can I make the costume easier for bathroom breaks?
Keep the shell separate from the trousers or use adjustable shoulder straps with an easy-release fastening. Avoid sewing the whole costume into a one-piece suit that is difficult to remove.
How do I make the costume more visible at night?
Add reflective tape to the front, sides, and back, and choose bright or contrasting colors. A supervising adult should carry a flashlight; do not add lights with loose wires or batteries the child can reach.
Cold & flu season Picks
humidifiers
As an affiliate, we earn on qualifying purchases.