
TL;DR
A closet booth works best when combining strategic placement, effective absorption, and proper ventilation. Moving your rig into another room can be the most effective noise control, while treating reflections and controlling low end improve sound clarity.
Ever tried recording vocals or podcasts in a tiny closet and wondered why it still sounds off? You’re not alone. The truth is, small spaces are tricky, but the right tricks can turn a cramped closet into a surprisingly good sound booth.
This guide cuts through the noise—literally. You’ll learn how to use placement, absorption, and ventilation to make your closet setup sound more professional, whether it’s for voiceovers, streaming, or music. The goal? Clearer recordings and less frustration, without spending a fortune.
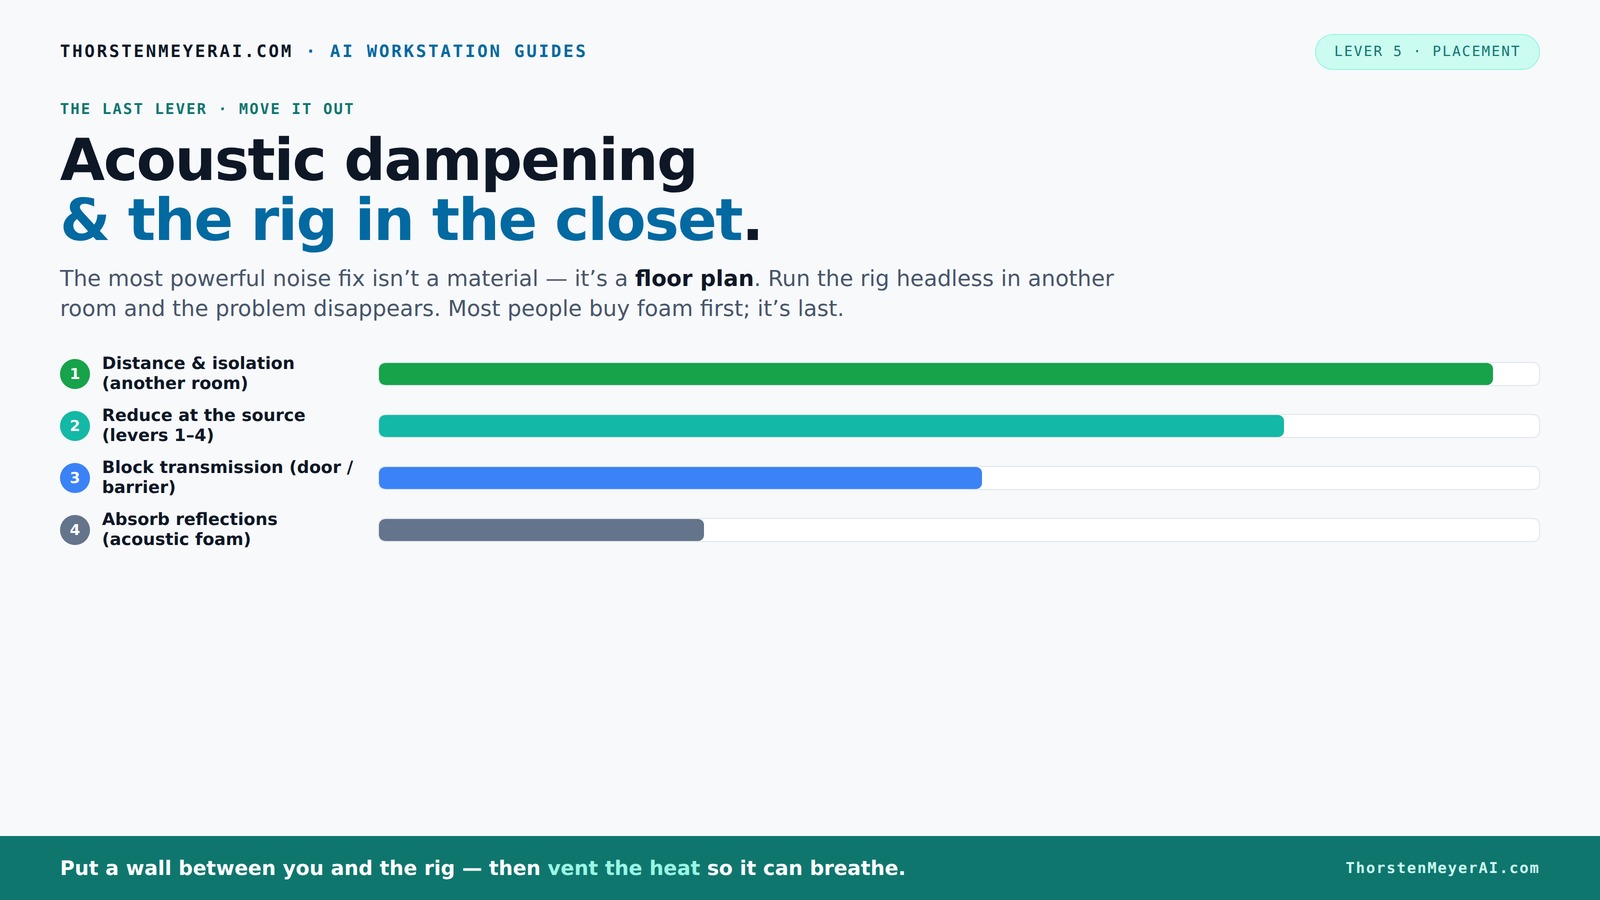
Acoustic dampening
& the rig in the closet.
The most powerful noise fix isn’t a material — it’s a floor plan. A rig you can’t hear because it’s in another room beats any amount of foam. Tap the approaches in Part 1 to see what actually works.
(another room)
(levers 1–4)
(door / barrier)
(acoustic foam)
Contain the noise, not the heat
Key Takeaways
- Moving your rig to another room is the most effective way to reduce noise, especially for high-power setups.
- Proper ventilation is critical when placing a machine in a closet—use active exhaust fans or purpose-built soundproof cabinets.
- Treat reflection points and corners with absorption and bass traps to get clear, natural sound in tiny spaces.
- Seal doors and gaps thoroughly to prevent outside noise leaks and improve overall isolation.
- Test your setup regularly by recording and listening, then tweak placement and treatment for best results.

50 Pack Sound Proof Foam Panels for Walls, 2 X 12 X 12 Inches Acoustic Foam Panels, High Density Acoustic Panels Sound Absorbing, Noise Cancelling Studio Wedges, Black (NOT INCLUDE ADHESIVE)
- Sound Absorbing Properties: Reduces noise and echoes effectively
- Resilient Material: Maintains shape after compression
- Quick Shape Recovery: Reforms within 3-5 hours
As an affiliate, we earn on qualifying purchases.
As an affiliate, we earn on qualifying purchases.
Why Distance Is Your Best Weapon Against Noise
Nothing beats putting physical space between you and your noisy rig. Moving your setup into another room—like a closet or basement—can reduce noise by over 80% compared to just adding foam.
Imagine your loud GPU humming away on your desk. Now picture it behind a thick door, in a closet, or in a nearby room. The sound doesn’t just disappear; it’s just so far away that your microphone picks up less of it.
For an AI workstation, this approach is gold. Your laptop or remote interface becomes your main workspace, while the rig roars in a corner or closet. The noise stops being a problem, and you can focus on your work or recording.
The 'Rig in the Closet' Setup — How to Keep It Cool and Quiet
Placing a hot, high-powered machine in a closet sounds perfect for noise reduction—until the heat builds up. Trapped heat can turn your quiet space into a furnace, causing your rig to throttle or shut down.
The secret? Ventilation. A simple passive vent helps, but active exhaust fans are better—pulling hot air out and bringing in cool air keeps your system running smoothly.
For serious silence and cooling, consider a purpose-built soundproof cabinet with ducted airflow and temperature control. These are designed to handle kilowatts of heat quietly, without sacrificing performance.
Check out how to set this up properly in this guide on reducing heat and noise in AI workstations.
Acoustic Dampening vs. Soundproofing — What Really Matters?
Many DIY closet booths focus on foam and blankets, thinking they block outside noise. But that’s only part of the story. Acoustic dampening controls reflections inside the space, making your sound clearer. Soundproofing, on the other hand, blocks outside noise from entering.
In a tiny closet, reflections cause echo and harshness—especially with hard surfaces. Covering walls with absorption material—foam panels, blankets, or even rugs—can turn a echoey nightmare into a cozy, controlled environment.
However, if outside noise leaks in, you need a solid barrier—like weatherstripping on the door or a sealed closet door. Treating both airborne and structure-borne noise separately makes a huge difference.
Understanding this distinction is crucial because investing only in foam panels without addressing gaps or structural leaks leaves a lot of outside noise unmitigated. Conversely, sealing gaps without proper internal absorption can lead to a dead-sounding, muffled environment. Combining both approaches ensures your space is both quiet from outside and acoustically controlled inside, resulting in a clearer, more professional sound.
The Perfect Microphone Placement for Small Rooms
Where you put your mic makes all the difference. In a tiny closet, aim the mic toward treated surfaces and away from reflective walls. Keep it at least 6–12 inches from walls to avoid harsh reflections.
For vocals, a cardioid mic placed about 6 inches from your mouth minimizes room noise. For voiceovers, placing the mic slightly off-axis reduces sibilance and room tone.
Use the rule of thirds: position the mic one-third of the way into the room from the wall, and treat the nearby surfaces to tame reflections. A well-placed mic can make a huge difference in clarity, even in a small space.
Treating the Critical Reflection Points — Walls, Ceiling, and Corners
In tiny closets, reflections bounce off every surface. Focus first on the first reflection points—side walls, ceiling above your head, and the wall behind the mic. Use acoustic panels or foam to absorb these.
Corners are low-end trouble spots. Add bass traps or thicker foam in corners where low frequencies tend to build up. This prevents that boomy, muddy sound that ruins clarity.
For example, a YouTuber turned a closet into a vocal booth by covering 80% of the side walls and ceiling with foam, plus corner traps. The difference? Clearer vocals and less echo.
Door and Gap Sealing — Stop Sound Leaking in or Out
Sound leaks through doors, cracks, and gaps. To keep noise contained, seal the door with weatherstripping or acoustic sealant. Covering the door with a thick blanket or foam panel can also help.
Imagine recording a voiceover and hearing your neighbor’s dog barking in the background—that’s a door leak. Sealing it stops outside noise from sneaking in and your sound from escaping.
For best results, use a combination of weatherstripping, door sweeps, and acoustic curtains. This simple step makes your closet booth much more effective.
How Much Treatment Is Enough in a Tiny Space?
In a small closet, more treatment usually equals better sound. Covering 20–30% of the walls with foam or panels can significantly reduce echo. For deeper low-end control, add bass traps in corners.
A small DIY booth might involve foam panels on the side walls, a rug on the floor, and corner traps. The key is more coverage rather than just focusing on corners alone.
Test your space by recording a test voice or instrument. If it sounds echoey or muddy, add more treatment until it feels balanced.
Testing and Fine-Tuning Your Closet Booth
The best way to know if your treatment works? Record and listen carefully. Use a consistent voice or instrument, then analyze the sound for echo, harshness, or low-end buildup.
Adjust placement, add or remove panels, and listen again. Small tweaks can make a big difference in clarity and warmth.
Remember, acoustics are dynamic—what works in the morning might change when the room warms up. Keep testing and fine-tuning your setup.ning until it feels right.
Frequently Asked Questions
Can I fully soundproof a closet booth?
Most small closet setups are designed for reflection control, not complete soundproofing. Outside noise can still enter, but proper sealing and absorption dramatically improve clarity.Where should I position my microphone for the best sound?
Place the mic aimed at treated surfaces, about 6–12 inches from your mouth, and avoid placing it directly against reflective walls. Use the rule of thirds for optimal placement.Do I need foam panels, blankets, or acoustic panels?
It depends on your goal. Foam and panels reduce echo and flutter, while blankets can dampen reflections. For outside noise, you need sealing and barriers.How much treatment is enough for a small closet?
Cover at least 20–30% of the walls with absorption, focus on reflection points, and add bass traps if low-end buildup occurs. Evaluate with recordings and tweak accordingly.Will a closet work for vocals or voiceover work?
Yes, if you treat it well—cover reflections, seal gaps, and control low frequencies. Proper mic placement and treatment turn tiny closets into effective recording spaces.Conclusion
In tiny spaces, the key isn’t just about stuffing foam everywhere. It’s about smart placement, effective treatment, and controlling heat and noise at the source.
Think of your closet as a mini studio—made better with the right airflow, thoughtful mic placement, and strategic absorption. When you get these elements right, your recordings will sound clearer, warmer, and more professional. And best of all? You’ll enjoy your space more, free from endless noise battles.