
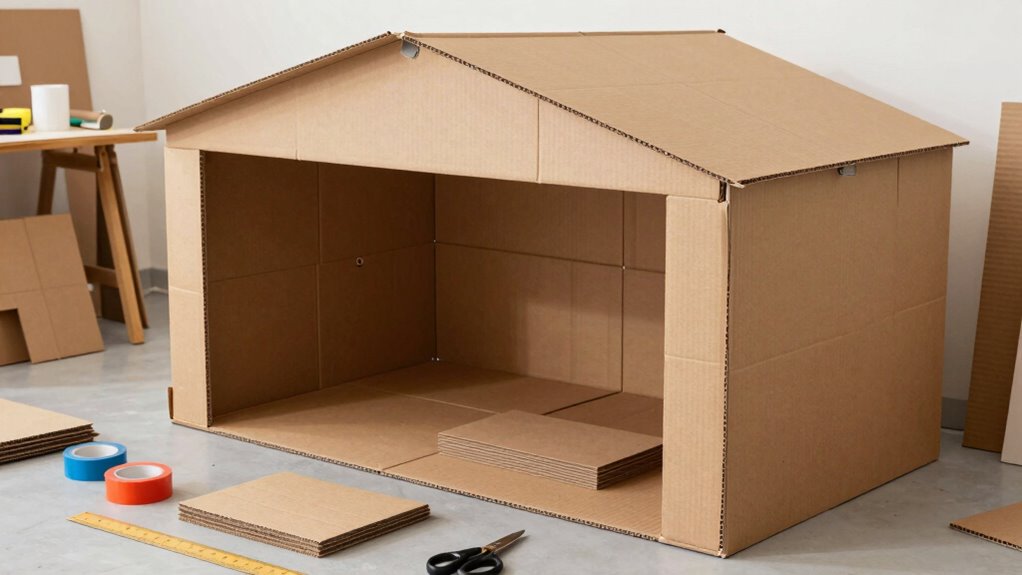
To build a cardboard garage that teaches engineering thinking, start by selecting durable, recycled cardboard and safe support materials like thick layers or lightweight wood. Sketch your design first, focusing on stability and functionality, then assemble it carefully, reinforcing key joints and stress points. Test its strength and make improvements to enhance stability and design. By following these steps, you’ll learn core engineering principles—keep exploring to discover more effective building tips.
Key Takeaways
- Use durable, reinforced cardboard and support beams to teach load-bearing and structural stability principles.
- Plan and sketch the garage layout carefully to understand design, proportions, and spatial reasoning.
- Reinforce weak joints and stress points with additional supports to demonstrate structural reinforcement strategies.
- Test the model under simulated loads to identify vulnerabilities and reinforce accordingly, fostering troubleshooting skills.
- Incorporate creative details and reflect on design improvements to promote engineering thinking and iterative problem-solving.

Tiocky Cardboard Construction Kit for Kids, 173PCS Cardboard Tools Building Set for Family Team DIY Activities, Creative STEM Educational Toys, Easter Gifts for Kids
Complete All-in-One Building Toolkit: Comes with 173 pieces including a safe cardboard cutter, scoring wheels, hole punch, screwdriver,…
As an affiliate, we earn on qualifying purchases.
As an affiliate, we earn on qualifying purchases.
How to Pick the Right Cardboard and Supplies for Your Garage
Choosing the right cardboard and supplies is essential to building a sturdy and functional garage. Start with material selection by choosing corrugated cardboard that’s strong and durable, preferably with multiple layers for added stability. Avoid thin or flimsy pieces that may collapse under weight or pressure. Safety considerations are equally important—make sure the cardboard is free of sharp edges or staples that could cause injuries. Use non-toxic adhesives and paints if you plan to decorate or reinforce your structure. Check the quality of your supplies before starting, and keep safety gear like gloves and safety glasses nearby. Properly selecting materials and prioritizing safety guarantees your garage will stand up well and keep everyone involved protected throughout the building process. Additionally, selecting floating on water compatible materials can enhance the structural integrity and sustainability of your project. Considering material strength can further ensure your garage remains durable under different conditions. Incorporating environmentally friendly materials can also contribute to a more sustainable build and reduce environmental impact. To maximize the durability of your structure, consider the moisture resistance of the materials you choose, especially if the garage will be stored outdoors. Moreover, evaluating the load-bearing capacity of your chosen cardboard can help prevent structural failure over time.
IQ BUILDER | STEM Learning Toys | Creative Construction Engineering | Fun Educational Building Set for Boys & Girls Ages 3-10 | Top Blocks Game Kit
EMPOWER YOUR CHILD WITH THE SKILLS NEEDED FOR A BRIGHT AND SUCCESSFUL FUTURE ✮ IQ builder has created…
As an affiliate, we earn on qualifying purchases.
As an affiliate, we earn on qualifying purchases.
Designing and Sketching Your Cardboard Garage

Once you’ve gathered your materials, it’s time to plan how your garage will come together. Start with a creative design that considers functionality and stability. Use sketching techniques to bring your ideas to life on paper. This helps you visualize dimensions, doors, and windows before building. Try different angles and perspectives to refine your design. Understanding basic digital content formats can also inspire innovative presentation ideas for your project.
Tiocky Cardboard Construction Kit for Kids, 173PCS Cardboard Tools Building Set for Family Team DIY Activities, Creative STEM Educational Toys, Easter Gifts for Kids
Complete All-in-One Building Toolkit: Comes with 173 pieces including a safe cardboard cutter, scoring wheels, hole punch, screwdriver,…
As an affiliate, we earn on qualifying purchases.
As an affiliate, we earn on qualifying purchases.
Building Your Garage: Step-by-Step Instructions

Start by gathering all your materials and tools so you’re ready to build. Then, construct the base frame carefully to guarantee stability. Mastering proper knife techniques can also help ensure your cuts are clean and safe during construction. Additionally, understanding seasonal considerations can help you choose the best time for building and testing your garage. Recognizing ergonomic design principles can also enhance the safety and usability of your finished project. Being aware of early warning signs for breast cancer can inform your health decisions and promote early detection. Incorporating safety and seamanship fundamentals into your planning can help prevent accidents and ensure a secure structure. Finally, add the roof and details to complete your garage and give it a polished look.
Gather Materials and Tools
Before you begin building your cardboard garage, gather all the necessary materials and tools to guarantee a smooth process. This step is vital for staying organized and efficient. Look for basic supplies like large cardboard sheets, scissors, and a utility knife. You’ll also need tape, glue, and possibly some ruler or measuring tape for accuracy. Consider incorporating DIY project ideas, such as using recycled materials or creative fasteners to make your design more eco-friendly and innovative. Remember to follow safety precautions, like wearing gloves and working in a well-ventilated area, especially when using sharp tools. Also, familiarize yourself with essential DIY tools and safety tips to prevent accidents. Collect everything beforehand so you can focus on building without interruptions. Proper preparation ensures your project progresses smoothly and safely from start to finish. Additionally, understanding building techniques can help improve the stability and durability of your cardboard garage.
Construct the Base Frame
To construct the base frame, begin by measuring and cutting your large cardboard sheets into the required lengths for the garage’s perimeter. Focus on material selection to guarantee the cardboard is sturdy enough to support the structure. Use a ruler and pencil for accurate measurements, then cut carefully with scissors or a utility knife. When designing the structural design, think about how the pieces will connect and support weight. Remember, a strong base needs precise joints and reinforcement. Incorporate materials and engineering principles to enhance the durability and stability of your structure. Reinforce corners with extra strips of cardboard and ensure all measurements are accurate before cutting. Additionally, consider structural analysis to identify potential weak points and improve your design accordingly. Understanding load distribution can help you optimize your design for better overall strength. Applying these engineering concepts will help create a more robust and reliable garage structure.
Add Roof and Details
Once the base frame is solid, it’s time to add the roof and details that make your garage look realistic and complete. For the roof design, choose a sloped or flat style, depending on your preference. Use sturdy cardboard pieces to create an overhang or rafters. Add decorative details like window trims, garage door handles, or a vent to enhance realism. These details teach you how different components come together in engineering. Visualize the process with this imagery:
| Roof Design | Decorative Details |
|---|---|
| Sloped or flat | Window trims, handles, vent |
| Overhang or rafters | Painting or coloring accents |
| Layered cardboard | Small hinges or latch features |
| Support beams | Personal creative touches |
Incorporating structural components helps deepen your understanding of how different parts work together in engineering. Paying attention to reinforcement techniques ensures your garage is sturdy and durable. To make your model more realistic, consider adding aesthetic details like color accents or textures that mimic real-world materials. Adding these elements completes your garage and deepens your understanding of structural and aesthetic design.

10 EcoSwift 8.5×11 Chipboard Cardboard Craft Scrapbook Material Scrapbooking Packaging Sheets Shipping Pads Inserts 8 1/2 inch x 11 inch Chip Board
Dimensions: 8 1/2" x 11"
As an affiliate, we earn on qualifying purchases.
As an affiliate, we earn on qualifying purchases.
Adding Support Beams and Reinforcements for Stability

To guarantee your cardboard garage stays sturdy, you need to choose support materials that are strong enough to bear weight. Carefully place reinforcements at key stress points to improve stability. Once assembled, test your garage under load to see if it holds up and make adjustments as needed. Incorporating structural reinforcement techniques can significantly enhance durability and safety. Using appropriate building materials can further ensure that your garage remains durable over time. Additionally, understanding neural interface principles can inspire innovative ways to monitor and reinforce your structure. Paying attention to eco-friendly disposal options for excess or damaged materials helps promote sustainability in your project.
Selecting Strong Support Materials
Choosing the right support materials is essential for guaranteeing your cardboard garage stays stable and sturdy. You need to focus on material strength to prevent collapsing or warping. Select support beams made from thick, durable cardboard or lightweight wood for added support. Consider the following when choosing your materials:
- Support beams with high material strength for durability
- Corrugated cardboard for enhanced stability
- Reinforced paperboards for load-bearing capacity
- Lightweight wood or bamboo for extra support
Using materials with greater strength ensures your support beams can handle weight and stress without bending or breaking. When selecting, prioritize sturdiness and compatibility with your design. Properly chosen support materials will give your garage the stability it needs while keeping it safe and fun to build.
Strategically Placing Reinforcements
Placing reinforcements strategically strengthens your cardboard garage and keeps it stable under weight and stress. Use reinforcement strategies like adding support beams at key joints and along load-bearing walls to enhance structural integrity. Focus on high-stress areas such as door frames, corners, and roof edges. Position vertical beams to distribute weight evenly and prevent buckling. Cross-bracing can also improve stability by preventing lateral movement. Remember, the goal is to create a balanced framework that can handle pressure without collapsing. Avoid over-reinforcing, which can waste materials and complicate construction. By thoughtfully placing your reinforcements, you ensure your garage remains sturdy and durable, teaching you valuable engineering principles about load distribution and structural stability.
Testing Stability Under Load
Testing the stability of your cardboard garage under load is essential to guarantee it can withstand real-world stresses. This step helps you assess how well your support beams and reinforcements maintain structural integrity under pressure. To make certain effective load distribution, check if the weight is spread evenly across your structure. Reinforce weak points, especially where beams meet, to prevent buckling. Consider the following:
- Add extra support beams at key load-bearing joints
- Use cross-bracing for lateral stability
- Distribute weight evenly across the roof and walls
- Reinforce corners and base for increased strength
Testing Your Garage and Making Improvements

Once you’ve built your cardboard garage, evaluating how well it functions and identifying areas for improvement is vital. Check the material durability by inspecting for weak spots, tears, or bending areas that might compromise its strength. This helps you understand which parts need reinforcement or better materials. Additionally, assess the design aesthetics—does the garage look appealing and realistic? Improving visual appeal can boost engagement and understanding of design principles. Take notes on what works well and what doesn’t, then make targeted adjustments. Reinforce vulnerable areas, refine structural elements, and consider if the design aligns with practical engineering ideas. Testing and iterating your garage ensures it’s not only sturdy but also visually effective, giving you valuable insights into engineering concepts.
Fun Challenges to Teach Engineering Principles

Engaging in fun challenges is a great way to deepen your understanding of engineering principles while keeping the activity exciting. These challenges encourage you to explore design concepts and material properties in creative ways. For example, you can test the strength of your cardboard by building a bridge and seeing how much weight it supports. Or, challenge yourself to create a roof that withstands simulated weather conditions. Other ideas include designing a garage door that opens smoothly or building a structure that maximizes stability with minimal material. You might also experiment with different cardboard thicknesses to see how material properties affect durability. These activities make learning hands-on, helping you grasp core engineering ideas through playful problem-solving. Plus, they keep the process engaging and rewarding.
Troubleshooting Common Building Issues

When building your cardboard garage, you’ll inevitably encounter common issues that can compromise its stability and functionality. One frequent problem is weak joints or connections, which threaten the structural integrity. To fix this, confirm your materials are compatible; for example, use sturdy tape or glue designed for cardboard, and avoid mixing incompatible adhesives. If walls wobble or collapse, reinforce them with additional supports or double layers of cardboard. Misaligned panels can also cause issues—double-check measurements before gluing or taping. Keep an eye on uneven surfaces, as they can stress the structure unevenly. By addressing these problems early and focusing on material compatibility, you’ll build a more durable, stable garage that stands up to play and teaches valuable engineering lessons.
Encouraging Creativity and Reflecting on Your Engineering Project

As you complete your cardboard garage project, it’s important to encourage your creativity and reflect on what you’ve learned. This helps you develop a deeper understanding of engineering thinking and enhances your problem-solving skills. Engaging in creativity reflection allows you to identify what worked well and what could be improved, fostering continuous growth. Consider asking yourself:
- How did my ideas evolve during the project?
- What challenges pushed me to think differently?
- How effective were my design choices?
- What skills did I develop through project evaluation?
Inspiring Future Engineers Through Hands-On Building

Building a cardboard garage not only teaches engineering concepts but also sparks excitement and curiosity in young builders. When you involve sustainable materials, like recycled cardboard, you demonstrate eco-friendly practices that inspire future engineers to value sustainability. Focusing on design aesthetics encourages you to think creatively about how the garage looks and functions, fostering an appreciation for both form and function. Hands-on building makes learning engaging and memorable, helping you understand structural principles through real experience. As you work on the project, you develop problem-solving skills and confidence, showing that engineering can be both practical and fun. This active involvement motivates you to explore more about how materials and design influence engineering solutions, nurturing a passion for creating sustainable, visually appealing structures.
Frequently Asked Questions
What Safety Precautions Should I Take During Construction?
You should wear safety gear like gloves, goggles, and a dust mask to protect yourself during construction. Make sure you have proper construction supervision to guide safe practices and prevent accidents. Keep your workspace organized and free of hazards, avoid sharp tools when not in use, and handle scissors or cutters carefully. Always work in a well-ventilated area, and don’t rush — safety comes first to guarantee a fun, injury-free project.
How Can I Customize the Garage’s Design for Different Terrains?
A stitch in time saves nine, so start by determining your terrain to tailor your garage’s design. For uneven or sloped ground, reinforce the base with extra cardboard layers or sturdy supports for terrain adaptation. Incorporate innovative design features like adjustable walls or flexible roof angles to suit different landscapes. This approach ensures your garage remains stable and functional, no matter the terrain, making your project both practical and creative.
What Are Eco-Friendly Materials Suitable for Building?
You should consider sustainable alternatives like recycled cardboard, bamboo, or reclaimed wood for eco-friendly building. Biodegradable options such as cornstarch-based bioplastics can also work well, reducing environmental impact. These materials are renewable, biodegradable, and safe for the environment. By choosing eco-friendly materials, you help minimize waste and promote sustainability while creating a sturdy, innovative garage that teaches valuable engineering thinking.
How Can I Make the Garage Weather-Resistant?
Don’t let the weather catch you off guard—your garage needs to stand the test of time. To weatherproof your cardboard garage, use weatherproofing techniques like sealing edges with waterproof tape and applying a clear weatherproof coating. Incorporate climate adaptation strategies by elevating the structure and adding a simple roof overhang. These steps help keep it dry, making your garage resilient against rain, wind, and sun.
What Tools Are Essential for Quick Repairs or Modifications?
You’ll want a basic DIY toolkit with a utility knife, scissors, duct tape, and glue for quick repairs or modifications. Keep repair guides handy to troubleshoot issues efficiently. A hot glue gun can help fix torn cardboard quickly, while additional tape or replacement pieces can be used for structural adjustments. These tools allow you to address common problems swiftly, ensuring your garage stays functional and durable.
Conclusion
As you step back and admire your finished garage, you can almost hear the clicks of your engineering ideas coming to life. But the real adventure begins now—will your design hold up under new challenges? With your newfound skills, you’re ready to experiment, improve, and build even bigger creations. The world of engineering is waiting, full of surprises. So, what will you create next? The possibilities are endless—your journey has only just begun.