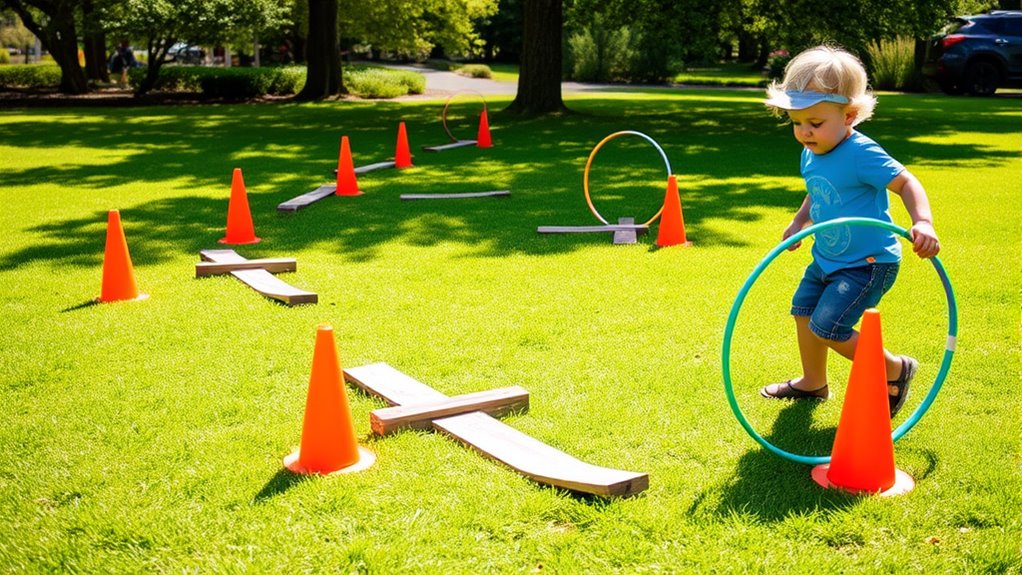
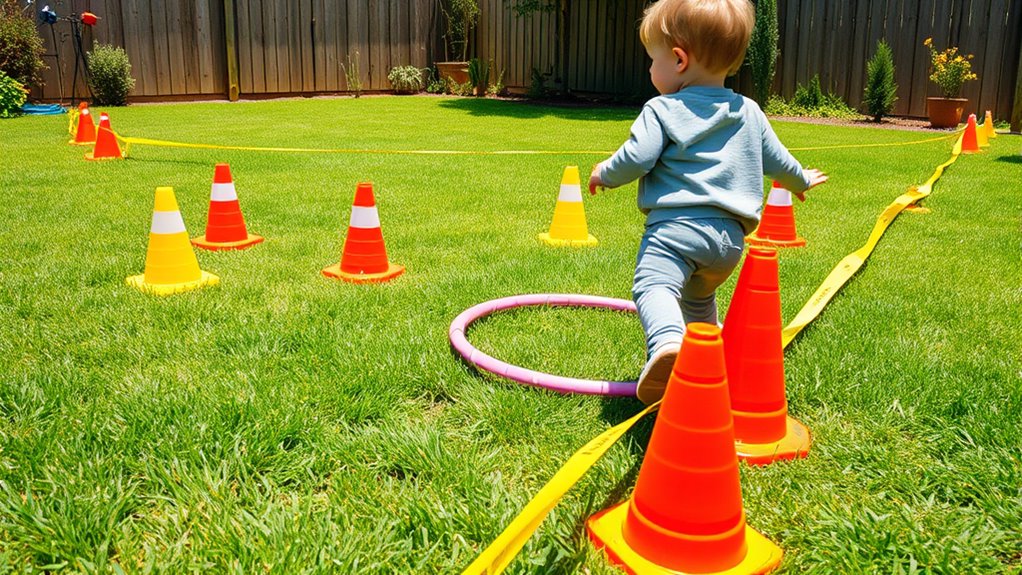
To build a simple obstacle course for testing problem-solving, start with lightweight materials like cones, foam, or PVC, and set up varied challenges such as weaving cones, ramps, and barriers. Space obstacles thoughtfully to keep the course manageable yet stimulating, allowing room for smooth navigation and decision-making. Incorporate visual cues to guide the robot, and gradually increase complexity to target different skills. Keep each element adaptable—if you want to explore more ways to refine your course, just continue exploring further.
Key Takeaways
- Design varied obstacles like cones, ramps, and barriers to challenge problem-solving and mobility skills.
- Space obstacles with manageable distances to ensure smooth navigation and decision-making.
- Use clear visual cues and high-contrast markers to improve obstacle recognition and response.
- Incorporate multiple paths and decision points to test navigation and problem-solving abilities.
- Keep materials lightweight and adjustable for easy modifications and tailored difficulty levels.
Creating a simple obstacle course is a fun and practical way to challenge yourself and improve your agility. Whether you’re designing it for yourself or testing a robot’s capabilities, the key lies in thoughtful course design. When focusing on robot agility, you need to think about how the layout and obstacles will push the robot’s problem-solving skills and physical movement. The goal is to create a course that tests different aspects of mobility, balance, and navigation, all while keeping it simple enough to build and modify easily.
Start by visualizing the kind of challenges you want the robot to face. Good course design involves a mix of obstacles that require different movements—such as weaving through cones, climbing over small ramps, or maneuvering around barriers. Think about the robot’s capabilities; if it has wheels, you’ll want to include tight turns and narrow passages to test its turning radius and control. If it’s a legged robot, consider obstacles that challenge its stability and stepping precision. Keeping the obstacles varied ensures your course will test multiple facets of robot agility, giving you better insights into its problem-solving abilities.
Visualize diverse obstacles like cones, ramps, and barriers to challenge your robot’s movement and problem-solving skills effectively.
When designing your course, pay attention to flow and spacing. You want the obstacles to be challenging but not overwhelming, so give enough room for the robot to approach and navigate each segment smoothly. You might include a sequence where the robot has to decide between multiple paths or choose a different approach to complete a section. This adds an element of decision-making, which is essential in testing problem-solving skills. Incorporate visual cues or markers to guide the robot or help it recognize the next obstacle, mimicking real-world scenarios where navigation depends on environmental cues.
As you build, consider the surface and environment—smooth, even surfaces are best for initial tests, but adding varied terrain can further challenge robot agility and course design. Use lightweight, inexpensive materials like cones, foam blocks, or PVC pipes for barriers, making adjustments easier as you refine the course. Remember, the focus isn’t just on difficulty but on how well you can observe and analyze the robot’s responses. Adjust obstacle placement and design based on performance to gradually increase complexity or target specific skills.
In addition, understanding how contrast ratio affects the visibility of visual cues can help optimize the course for better robot recognition and response. Incorporating clear, high-contrast markers ensures the robot can easily distinguish obstacles and navigate more effectively. Adjust obstacle placement and design based on performance to gradually increase complexity or target specific skills.
In the end, designing a course that challenges robotic agility isn’t just about the obstacles themselves; it’s about creating an engaging, adaptable testing environment. By carefully considering course design and obstacle placement, you’ll develop a versatile platform to evaluate and enhance problem-solving in robots or even yourself. This process encourages innovation, critical thinking, and hands-on learning—all essential in mastering obstacle course challenges.
robot obstacle course kit
As an affiliate, we earn on qualifying purchases.
As an affiliate, we earn on qualifying purchases.
Frequently Asked Questions
What Safety Precautions Should I Consider During Construction?
You should prioritize safety by wearing protective gear like gloves, goggles, and sturdy shoes during construction. Conduct a hazard assessment beforehand to identify potential dangers such as sharp objects or unstable structures. Keep your workspace organized to prevent trips and falls. Always handle tools carefully, follow safety instructions, and guarantee proper supervision if needed. Staying alert and cautious helps prevent accidents and keeps everyone safe while you build your obstacle course.
How Do I Modify the Course for Different Age Groups?
Think of your obstacle course as a chameleon, changing to suit each age group. To tackle adaptive challenges, you’ll want age-appropriate modifications like softer surfaces for younger kids or more complex tasks for older ones. Adjust the height, difficulty, and safety features accordingly. By tailoring each element, you guarantee everyone faces the right level of challenge, keeping the activity engaging, safe, and fun for all ages.
What Materials Are Safest and Most Durable for Obstacles?
You should choose materials with high safety and durability considerations, like soft foam, rubber mats, or PVC pipes, which minimize injury risk and withstand frequent use. Avoid sharp edges and toxic substances. Wood treated for outdoor use is durable but verify it’s smooth and splinter-free. Always verify that materials meet safety standards, and regularly inspect obstacles for wear and damage to keep your course safe and long-lasting.
How Can I Incorporate Educational Elements Into the Course?
You can add educational elements by designing interactive challenges that promote cognitive development, like puzzles or math problems at each station. Incorporate riddles or memory games into obstacle tasks to keep kids engaged. Use signage with fun facts or problem-solving prompts to encourage thinking on the go. This way, your course becomes more than just physical; it’s a lively platform for learning, proving that the proof is in the pudding.
What Is the Ideal Size for a Beginner Obstacle Course?
For a beginner obstacle course, aim for manageable obstacle dimensions, around 3 to 4 feet high and 4 to 6 feet wide, to guarantee safety. Keep the course simple to reduce complexity, focusing on 3-5 obstacles that promote confidence and skill-building. As you gain experience, you can gradually increase course complexity and obstacle dimensions. Always prioritize safety and accessibility for all participants.
DIY obstacle course materials
As an affiliate, we earn on qualifying purchases.
As an affiliate, we earn on qualifying purchases.
Conclusion
Now that your obstacle course is set up, the real challenge begins. Will you conquer each obstacle and reveal the secrets hidden within? The path ahead is filled with surprises, testing your problem-solving skills at every turn. One step closer, one decision at a time—are you ready to face what’s next? Remember, the true test isn’t just completing the course, but discovering what you’re capable of when the unexpected appears. The adventure awaits—are you prepared to take the leap?
lightweight cones for obstacle course
As an affiliate, we earn on qualifying purchases.
As an affiliate, we earn on qualifying purchases.
robot navigation training set
As an affiliate, we earn on qualifying purchases.
As an affiliate, we earn on qualifying purchases.